24 June 2020
Technology
3
min read

Andres Castaneda
,
Senior Developer
For clarification, reference to SolrCloud means the mode in how Solr is running and not to be confused with Solr running on the cloud.
Using Sitecore Solr Compatibility as reference, SolrCloud in this article is officially supported on Solr 7.5
Getting started
The configuration uses 3 instances of Solr, 3 Zookeepers and a Load Balancer.
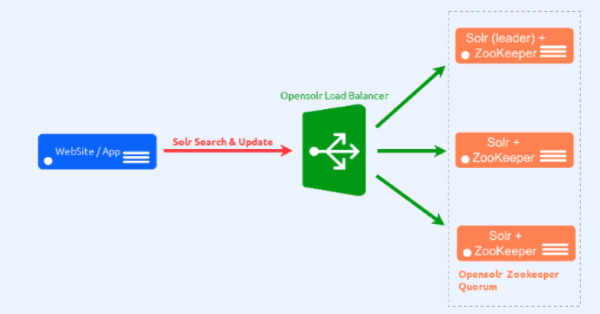
Source: Open Solr
Requirements
Java Virtual Machine release 1.8: jre1.8.0_231 used in this example
JAVA_HOME: Needs to be set in the environment variables
Load balancer installation
Install a load balancer. Port 3010 is used for the load balancer but will also have the IIS Reverse Proxy configured to be able to have URL that uses the default https port (443).
Configuring zookeepers
Zookeeper is a centralized open-source server for maintaining and managing configuration information, naming conventions and synchronization for a distributed cluster environment.
Zookeeper helps the distributed systems to reduce their management complexity by providing low latency and high availability.
To create a Zookeeper ensemble, a minimum of 3 nodes are required. It is advisable to always use an odd number of nodes (3,5,7…) to create a zookeeper ensemble.
Download latest Apache Zookeeper
Unzip and extract the file. Name the file, for instance, zookeeper-3.5.6 (you can use 7zip for this)
Make three copies of zookeeper-3.5.6 with the following folder paths:
D:\codehousegroup\zk\solr1.dev-codehousegroup.com\zk-3.5.6\1
D:\codehousegroup\zk\solr2.dev-codehousegroup.com\zk-3.5.6\2
D:\codehousegroup\zk\solr3.dev-codehousegroup.com \zk-3.5.6\3
Create Directories
D:\codehousegroup\zk\solr1.dev-codehousegroup.com \zk-3.5.6-data\1
D:\codehousegroup\zk\solr2.dev-codehousegroup.com \zk-3.5.6-data\2
D:\codehousegroup\zk\solr3.dev-codehousegroup.com \zk-3.5.6-data\3
Create files with no extension
D:\codehousegroup\zk\solr1.dev-codehousegroup.com \zk-3.5.6-data\1\myidandput “1”
D:\codehousegroup\zk\solr2.dev-codehousegroup.com \zk-3.5.6-data\2\myid and put “2”
D:\codehousegroup\zk\solr3.dev-codehousegroup.com \zk-3.5.6-data\2\myid and put “3”
The ID identifies each server for communication between the ensembled servers.
Open files solr1-solr8 in a Text editor and set existing values and add the missing ones
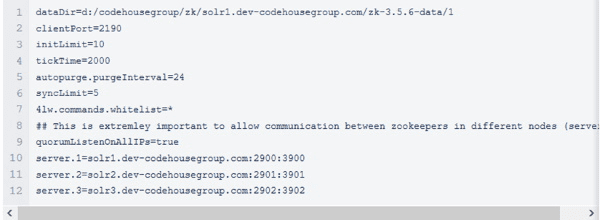
Note that you can set the values of solr1, solr2 and solr3 to be localhost. The current configuration assumes there is an entry in the hosts file to resolve to localhost 127.0.0.1.
Explained: The ports next to solr1
Running zookeeper services
Open the Command prompt with Administrator privileges and run:
CD D:\[your domain]\zkzsolr1. dev-codehousegroup.com\zk-3/5/6\binzkServer/cmd
Do the same for solr 2 and solr3, ensuring the Command prompt is left to keep the service running.
When the Zookeepers' services are running without failing and they’re connected to each other, register them as services using NSSM.
Verifying Solr instances
Although this article doesn’t cover the installation of the Solr instance, it’s important to ensure that you install the specific version from the requirements section and install 3 instances of this. Then set up Solr to run under HTTPS.
In this example, the ports used for the Solr instances were 9001, 9002, 9003:
https://solr1.[YOUR DOMAIN]:9000/solr
https://solr2.[YOUR DOMAIN]:9001/solr
https://solr3.[YOUR DOMAIN]:9002/solr
Assuming the Solr install is running as a service, go to the "Services" of Windows and stop the 3 Solr services. Set them as disabled for the start-up type. This is because the default installation is running in standalone mode.
Solr with SSL
If your current configuration of Solr is to run on HTTPS, then in order to support the SolrCloud mode and the Zookeepers needed to run this, the Zookeepers must be already running the service.
Repeat the process for the other two Zookeepers
Start Solr in Cloud mode and connected to Zookeepers
Open the Command prompt with Administrator privileges and run:
Repeat for solr2 and solr3. You should see this for each instance:
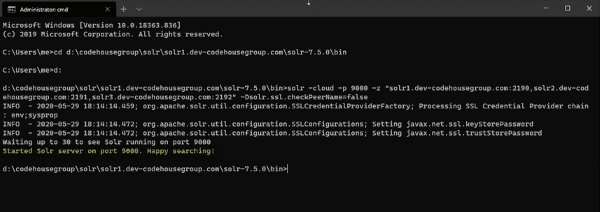
If you run the above commands as a service, you MUST include an extra parameter of -f otherwise it's not going to work.
This is to make it run in the foreground of the service: -cloud -p 9000 -z "solr1.[YOUR DOMAIN]:2190,solr2.[YOUR DOMAIN]:2191,solr3.[YOUR DOMAIN]:2192" -Dsolr.ssl.checkPeerName=false -f
Select the URL of any Solr instance. You won't see any collection as nothing has been configured yet. But you will see new option in the left navigation:
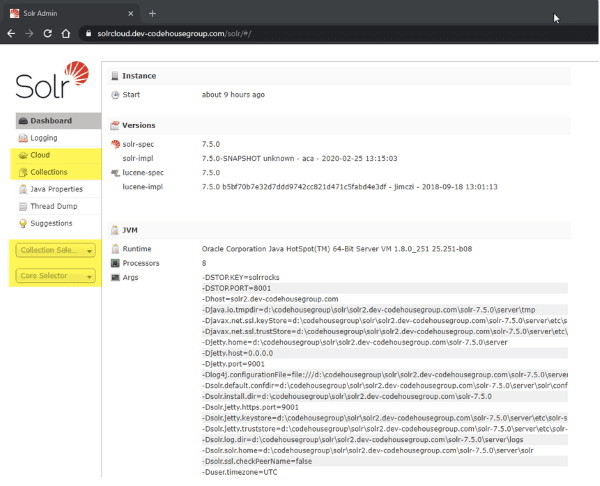
Preparing SolrCloud for Sitecore
It’s important to upload the configset containing the Sitecore schema to the Zookeepers. Zookeeper doesn't keep a physical reference to the configset in the file system, instead it keeps it somewhere in memory or in a custom runtime file.
Ensure you have a copy of the Sitecore config set from the vanilla Solr Sitecore installation, there is a command that uploads this content to the Zookeepers.
Assuming you have you Sitecore Solr configuration in C:\solr\sitecore_configs\conf, open the Command prompt as an Administrator and run prompt below to upload the config to the Zookeepers:
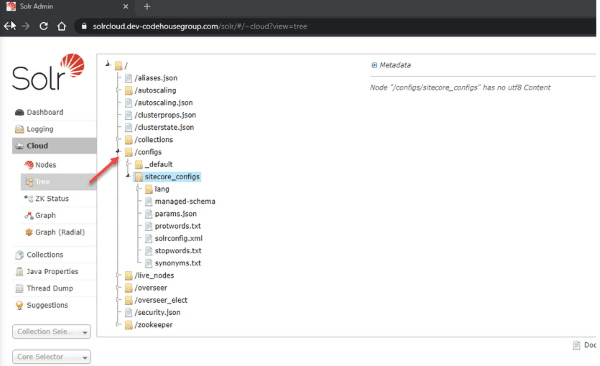
1. Go to your SolrCloud URL and in the tree of /configs you should see the new config, if not you’ll have to troubleshoot why it is not uploading the config because, beyond this point, if the config isn’t there, it will not work. You’ll notice the URL doesn’t have any port and that’s because the IIS Reverse Proxy has been configured to remove the load balancer port.
2. Create the expected Solr collections. To do this execute the following PowerShell code snippet with different $coreName variable value for each of the cores.

3. After calling the multiple URL to create the collections (cores), go to your URL.
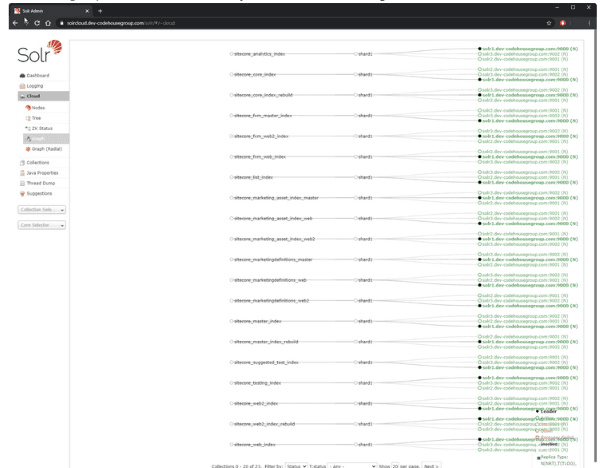
4. Spin up the Sitecore instances with the collections (cores) in place having added your changes to Sitecore to run in SolrCloud mode.
Configuring Sitecore instance to run in SolrCloud mode
To have references to Solr in roles, Content Management, Content Delivery, and Collection Search, update any reference to Solr.search in the connection strings.
Notice there’s a ;solrCloud=true in the connection string.
For the config file to immediately work for these instances, rename it from:
\App_Config\Include\Examples\Sitecore.ContentSearch.SolrCloud.SwitchOnRebuild.config.example to \App_Config\Include\Examples\Sitecore.ContentSearch.SolrCloud.SwitchOnRebuild.config
Enabling the config file assumes by default that the SwitchOnRebuild is used for Core, Master and Web. If these aren’t being used for custom indexes it is recommended to set these up to prevent downtime during indexes/cores rebuild.
Remember to always use patching to modify Sitecore vanilla configs and never modify files directly. The example file above tries to add it to your customisations folder instead.
It's recommended you enable the following Sitecore setting ContentSearch.Solr.EnforceAliasCreation to true. The default is false, if you run a rebuild from the Index Manager, you’ll get an error when it’s finished if this setting is false and you haven't manually set this Solr interface or using the Solr CLI.
If the EnforceAliasCreation is setup as true, you should see an alias.
Below is an example of how custom index patches the index for use with SolrCloud:
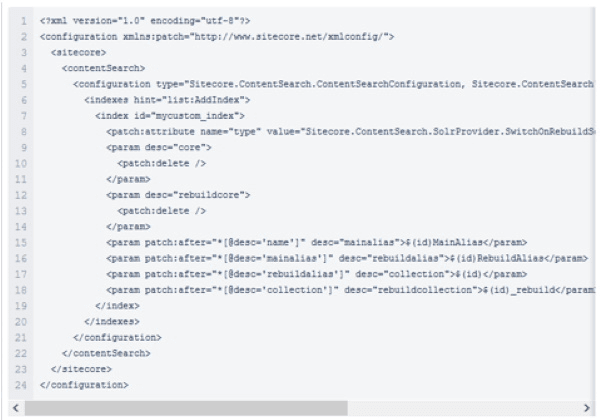
Start the Sitecore Application and everything should load normally. Then, go to Index Manager in the Sitecore Control Panel and rebuild custom indexes or the core index to test.
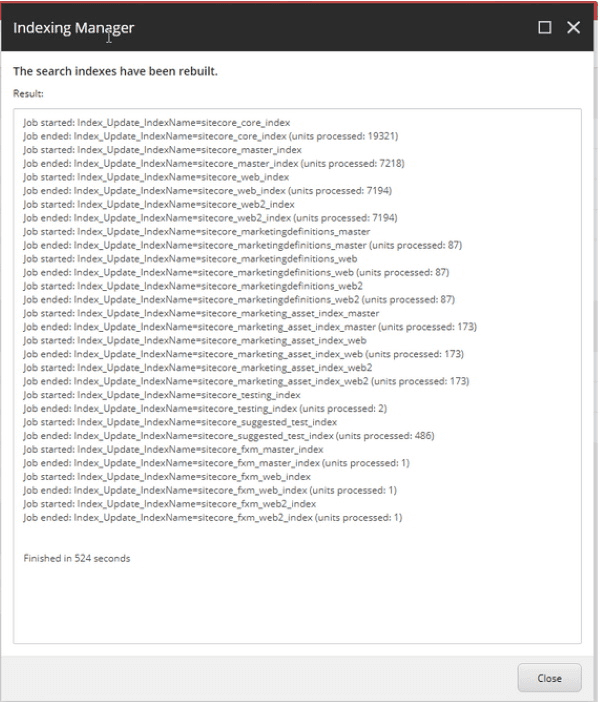
The configuration for the indexes are for a CM server. The configuration for CD server(s) is different.
While this article focuses on having SolrCloud on the same server/machine, when scaling this to a production level infrastructure be aware of opening the ports of the Solr Instance (Node), Zookeeper Client, Quorum and Leader ports.
Working with Codehouse
For more help, our development team has years of experience working on complex Sitecore projects that require complex and expert development skills.
Get in touch to find out more about investing in Solr as a Service. We can also help with anything Sitecore including getting your solution to run efficiently in the cloud.
Related link:
More articles by this author: Mono-repo or multi-repo? XM Cloud microservices management


