Oct 5, 2020
Technology
Marketing
3
min read

Peter Lambrou
,
Sitecore Optimisation Consultant MVP Strategist
Content testing helps marketers see what works best for website visitors, and which best delivers against marketing and business goals.
A/B testing and multivariate testing delivers better customer experiences, and better results. The Sitecore Experience Platform is a powerful content management system. It has out-of-the-box testing capabilities that support A/B and multivariate testing. These are configured using Page Tests and Component Tests.
Creating a page test in Sitecore
Page tests allow marketers to test pages, and different versions of pages, against one another. They are configured in the Experience Optimisation application, accessible via the Launchpad, or in the Experience Editor in the Optimisation tab.
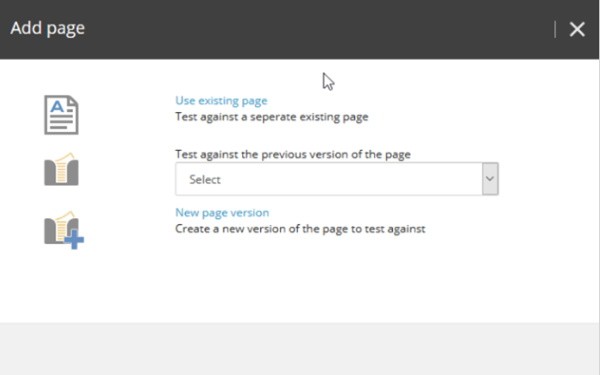
To get started select Create Page Test to choose the page you want to test against from the Add Page window. This offers three options:
Use existing page
Test against previous version of the page
New page version
Continue this process, i.e. adding the pages you want tested and then proceed to the next step in the process.

Reviewing and starting a page test in Sitecore
This process enables marketers to refine the page test. This involves configuring important test attributes:
Expected effect of changes: How will the changes influence the engagement value of the page being tested?
Page exposure: What percentage of visitors will be exposed to the test? If it’s set at 50% half the number of visitors will see one of the variations, including the original. The other half will see the original variation of the page.
Confidence levels: Set a statistical confidence level. This is what the test needs to reach before it ends. The higher the level the longer the test.
Duration: Specify how long the test should last. Choose from a minimum of 3, 7 or 14 days, up to a maximum of 14, 30 or 90 days.
Test objective: Select from Goal or Trailing Value/Visit.
Picking the winner: Declare the winner from three options:
Automatically select a winner based on the test objective
Automatically select a winner based on the test objective, unless it significantly decreases engagement value
Manually select winner
Select Start Test when everything has been configured.
Creating a component test in Sitecore
A/B and MV testing in Sitecore is not limited to page tests. Component testing, a process of testing page components against one another, is also supported. Components are pieces of modular content like images, text etc. configured to be added to page templates.
In the Experience Editor select a component. From the floating toolbar choose the Test the component icon.
The next stage of the process is to select the component(s) you want to test against. This is done in the Test the Component modal window.
Selecting New Variation adds a new variation of the same component type that will be tested against the original. In addition to searching for content, marketers have more options available in the Select the Associated Content modal window:
Select Existing Content
Clone an Existing Item
Create New item
There’s also the option of hiding the component. This is controlled by the Hide Component checkbox. In addition, marketers can switch one component type with another type or change the design of a component. Changing the component design is controlled by the Enable variation of component design check box.
When all component variants have been configured, marketers can toggle through each variant using the floating toolbar in the Experience Editor.
With the component variants in place it’s time to run the test. If workflows are configured Approve with Test is displayed in the blue notification bar. If however, no workflows are configured Create Test is displayed.
Preview and Start the test from the subsequent window.
Seeing the results
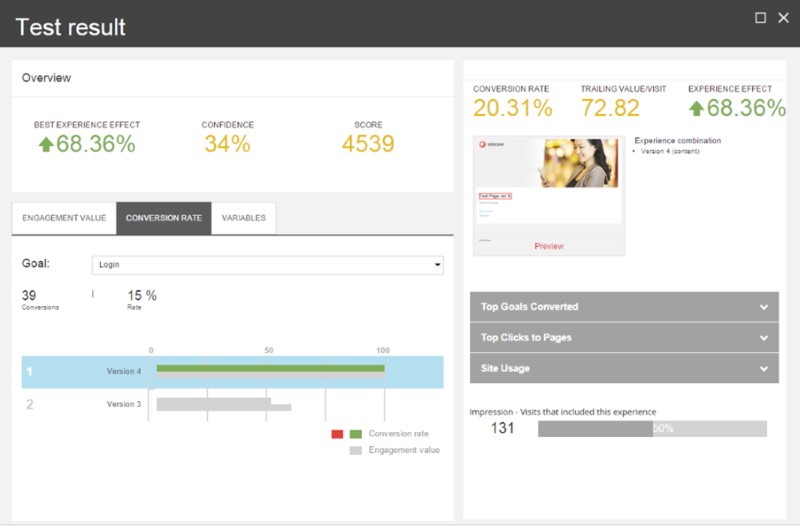
The Test Result button in the Experience Editor’s navigation bar reveals the test result report. The results page displays:
Best Experience Effect: Metrics for the best performing experience. Sitecore calculates this as the percentage difference between the original's trailing value and the best experience in the test.
Confidence: The level of confidence the page has reached based on the level set.
Score: Based on the engagement value and the importance of the tested page, this is the score assigned to the test creator.
The page also consists of three tabs, each with their own unique metrics:
Engagement Value: The engagement value achieved during the test.
Conversion Rate: The conversion rate of all experiences.
Variables: The engagement value of each test variable.
In addition, marketers can also look at Top Goals Converted, Top Clicks to Pages and Site Usage. The Test Results page displays insightful metrics.

Experience Optimisation dashboard
The Experience Optimisation dashboard is the hub of all testing activity, results and recommendations. From here, marketers can access:
Draft page Tests: Tests not started
Active Tests: Lists all active tests
Historical Tests: Lists completed tests
Suggested Tests: Suggests areas of your website that need testing
Active Personalisation Report: Available in Sitecore 9.2 and above, this report displays your website's personalised experiences and metrics
Personalisation Suggestions: Available in Sitecore 9.2 and above, suggests areas of your website that need personalisation
Leaderboard: Displays number of Key Performance Indicators (KPIs) for testing content
Best Guessing: Displays guessing scores
Highest Effect: Displays scores for effect
Most Active: Indicates who has created most tests
Performance Report: Displays a graph of test performance
Testing in an experience management system like Sitecore delivers statistical significance to website content. It enables marketers to really know their content and how it resonates with website visitors.
Working with Codehouse
At Codehouse we can get you started with A/B and multivariate tests. We’ll guide you through Sitecore’s optimisation tools and how they can help you achieve your digital goals. Get in touch.


